How to Draw a Drag Queen: The Technical Addendum
Alright, so you want to learn some of my Photoshop tricks? First of all, you should know that I'm using the ancient CS2 on PC, so feel free to laugh at my expense if I use any obsolete terminology or betray my ignorance of whatever fancy new tools that may be available to those with newer software.
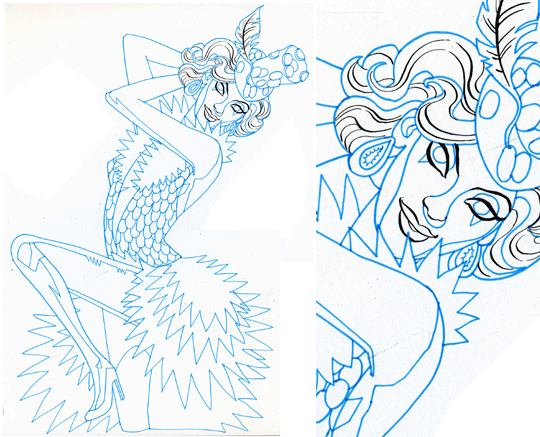
The final drawing for my "Money" portrait of Raja utilized blue and black ink, because it's easy to separate the two in Photoshop for whatever nefarious purposes you may have in mind. In my case, I'll use the blue outlines to serve as the boundaries for my flat colors, whereas the black linework will stay just that-- linework.
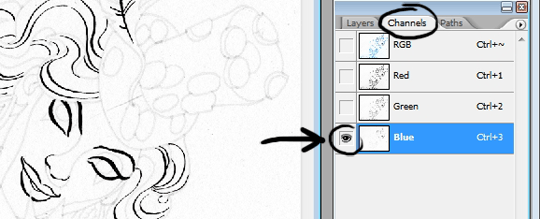
To separate the black lines from the blue: You can knock out the blue ink using color channels--I hit CTRL + 3 to select this "blue" channel, which filters out the blue (or something. I've never completely understood this.) Given the particular shade of blue I used (from a cheap felt tip marker) almost all of the blue is taken out of the drawing. I select it all and copy it to a new layer.
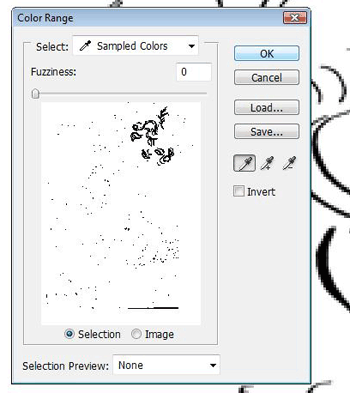
To clean up the new layer, I use "Threshold" to remove any lingering traces of blue ink. Then I use "Select color range" to make a selection of all the white on this layer and delete it. This will leave you with JUST the black linework. In my Drag Race work, I don't like to rely on only black line, so later on, I'll hit the "transparency lock" button (or, uh, whatever it's called) and I can easily use a brush to color the lines to more successfully integrate them into the final work.

So, back to the original layer with the blue (and black) ink. We'll use this to lay in the "flats", which are the flat patches of color that serve as the foundation for the piece. This process utilizes a free Photoshop plug-in called Bpelt. (you can download it here) It's a great tool, and you should totally support the developers, as they've made life easier for countless illustrators and comic artists. HOWEVER, it comes with a bit of a learning curve--you should follow their instructions closely to avoid any number of f*&k-ups that will result in your first few attempts at using it.
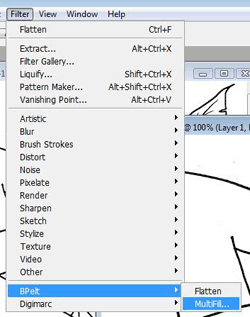
Basically, you need to use the "Threshold" tool once again, making both colors of ink into black linework. Once you run Bpelt's "Multifill" and then "Flatten" filters, you'll have something that looks like this:

Bpelt divides up your drawing into random colors, which you can then easily fill in however you choose (use the paintbucket tool, with anti-alias turned off).
Some of my simpler Drag Race art is entirely comprised of these flat colors, but if I'm going for something more complex, I'll add layers of texture or transparent color--especially with the queens' cheeks!
And then, in the case of this portrait, there are those crucial lines in the face and hair. As I mentioned, I color some of those lines to make them more subtly incorporated into the colors beneath. (Again, use the transparency lock)
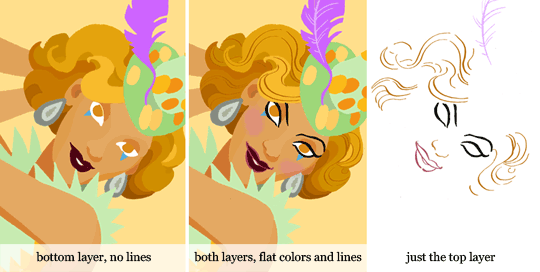
There are plenty of technical mistakes that I'm still working through, but it's about using the technology to serve your artistic vision. You could use the most advanced, complicated software, but if you lack a good eye and striking composition, it's not going to be anything special.
Thanks so much for reading through all this! I know it's not exactly a step-by-step guide, but you can feel free to contact me if you have any specific questions about the process.